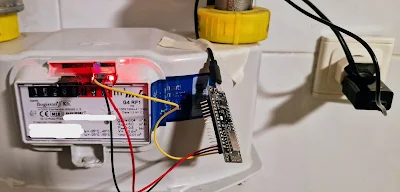
This is a low-cost solution for tracking home gas consumption in Home Assistant. Ideal for those who want to drill down into their consumption of gas but their utility provider does not offer smart metering.
The solution works with those residential diaphragm gas meters that come 'smart ready'. The gas utility company providing service in my home installed the model Itron-Flogiston G4 RF1 which is a typical example of these devices. According to the specification the device is equipped with a totalizer that includes a "pulse generator (option)... with a permanent magnet in counter roller. Can be refitted with a pulse transmitter (Reed switch)."
I had to answer the following challenges:
- Reading the magnetic impluses of the totalizer.
- Converting the data and storing it in Home Assistant.
- Visualization, analysis
Reading the magnetic impulses of the totalizer
The Hall-sensor module (KY-024) is connected to a NodeMcu ESP8266 development board powered over USB. Luckily in my home there is an outlet quite close to the gas meter thus power source was not an issue. This KY-024 sensor module offers both digital and analogue output, however after a couple of experiments I decided to use the analogue source connected to the Analogue PIN of the development board. Similar attempts show that the method does not neccesarily work in all cases, but it worked for me with a total hardware investment under $5.
Converting the data and storing it in Home Assistant
The NodeMcu microcontroller was installed with ESPHome firmware so that I could make use of its feature rich integration to Home Assistant. (ESPHome is an open source project by Nabu Casa, the team behind Home Assistant.)
The configuration file of ESPHome allows the setup of reading and transmitting analogue sensor data without any coding. Let me copy here only that part of the firmware configuration that covers the sensor reading:
- platform: adc
pin: A0
name: "Hallsensor"
update_interval: 1s
raw: True
unit_of_measurement: "value"
accuracy_decimals: 0
The above configuration invokes the analogue-to-digital converter of ESPHome to measure voltage level on GPIO PIN A0 at every second and transfers it HomeAssistant without any conversion using the friendly name "Hallsensor".
The ESPHome integration creates a HomeAssistant entity for this data. The number of pulses is counted as a counter defined in Home Assistant counter helper with the current total usage set as the 'initial value' of the counter. A simple HomeAssistant automation is triggered if the raw voltage data goes below a certain threshold value. The trigger calls the service counter.increment.
alias: Gas meter
description: ""
trigger:
- platform: numeric_state
entity_id:
- sensor.esphome_web_cf8530_hallsensor
below: 810
condition: []
action:
- service: counter.increment
target:
entity_id: counter.gas_counter
data: {}
mode: single
Visualization
{{ states('counter.gas_counter')|float*0.01}}
Summary: setup step-by-step
- Connect the KY-024 sensor with the ESP8266: 3V3, GND and AO PINS.
- Install ESPHome to Home Assistant.
- Setup and install the ESPHome firmware to the microcontroller.
- Define a counter helper in HomeAssistant.
- Create an automation triggered by the ESPHome counter.
- The automation calls counter increment service.
- Define virtual sensors with the utility meter integration.
- Add a template to compute the cubic meter value.
- Start collecting data.
- Define hourly, daily, weekly dashboard charts and analyse.


